

Before you start
- Understanding APFS, launchd and recovery mode: see macOS under the hood
In plain words
You troubleshoot a Mac like a modern car: most breakdowns are fixed by switching off the ignition and starting again, the dashboard (Activity Monitor, logs) often tells you where to look, and the garage (recovery, DFU) is only for the last resort. The condition for everything else: an up-to-date backup.
1. The method: from the gentlest to the most drastic
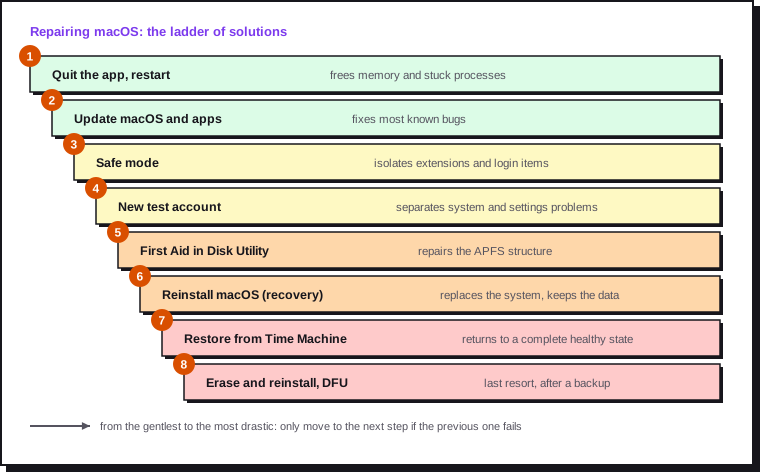
Before any heavy repair, check that Time Machine has a recent backup (see Backing up your Mac with Time Machine) and that you know your Apple Account password: it's asked for after a reinstall (Activation Lock).
On an Apple silicon Mac, the old reset the NVRAM and reset the SMC routines no longer exist: a full thirty-second shutdown does the job instead.
2. Activity Monitor in depth
| Tab | What to look at |
|---|---|
| CPU | Sort by "% CPU". A process stuck at 100% continuously is abnormal; a high kernel_task signals that the Mac is cooling itself |
| Memory | Memory pressure (green, yellow, red) and the "Swap Used" line |
| Energy | The "12 hr Power" column reveals the app draining the battery |
| Disk | Bytes written: an app writing non-stop wears out the SSD and slows everything down |
| Network | An app sending a lot for no reason deserves investigation |
Double-click a process, then Sample to get a report of what it's doing: attach it to a bug report. To force-quit a frozen app: Cmd + Option + Esc.
3. Crash reports and the unified log
Crash reports are saved in:
| Folder | Content |
|---|---|
~/Library/Logs/DiagnosticReports |
Crashes of your apps (.ips) |
/Library/Logs/DiagnosticReports |
System crashes and kernel panics (panic-full-* files) |
The Console app shows them under Crash Reports. In a kernel panic report, the line listing the loaded extensions (last loaded kext) or the name of a third-party driver points to the culprit.
The unified log can be filtered in Terminal:
# Errors from the last 30 minutes
log show --last 30m --predicate 'messageType == error' | tail -40

# Messages from a specific process
log show --last 2h --predicate 'process == "backupd"' | tail -20

# Reasons for the latest shutdowns and restarts
log show --last 3d --predicate 'eventMessage CONTAINS "Previous shutdown cause"'
A negative shutdown cause (for example -128 or -62) signals an abnormal shutdown: power cut, crash, thermal or hardware problem.
4. Apple Diagnostics
Apple Diagnostics tests the hardware (memory, storage, battery, sensors, logic board):
Step 1. Shut down the Mac and disconnect accessories, except keyboard, mouse, display and power.
Step 2. Hold down the power button until "Loading startup options" appears.
Step 3. Press Cmd + D.
The test takes a few minutes and displays reference codes (for example PPT004 for the battery) to give to support. No code doesn't guarantee there's no fault, but it rules out the most common ones.
5. Isolating: safe mode and a test account
Safe mode checks the startup disk, loads only essential extensions, disables login items and clears some caches.
Step 1. Shut down the Mac, then hold down the power button until the startup options appear.
Step 2. Select the startup disk, hold down Shift, then click Continue in Safe Mode.
"Safe Boot" appears in red in the menu bar. If the problem disappears, it comes from a login item, an extension or a third-party setting. Go back to a normal start-up and disable the items one by one (see Mastering and optimising macOS).
A test account separates a system problem from a problem with your settings: create an account in System Settings › Users & Groups, sign in and reproduce the problem. If it doesn't appear, the cause is in your ~/Library folder (preferences, caches, agents).
A few targeted repairs:
# Reindex Spotlight
sudo mdutil -E /

# Reset an app's permissions
tccutil reset All com.example.app

# List, then install updates
softwareupdate -l
sudo softwareupdate -ia --restart
6. Disk Utility
First Aid checks and repairs the APFS structure. On the startup disk, it can only check while running: to repair, run it from recovery mode (Disk Utility, then First Aid on the container, then on each volume).
diskutil verifyVolume /                    # check the startup volume
diskutil apfs list | grep -E "Volume|FileVault|Sealed"
If First Aid reports errors it can't repair, back up immediately: it's often the sign of an SSD at the end of its life.
7. Reinstalling macOS and restoring
Reinstalling macOS from recovery mode (hold the power button › Options › Reinstall macOS) replaces the system without touching your data or your apps. It's the answer to a system misbehaving after a failed update.
Restoring from Time Machine goes back to an earlier complete state: from recovery (Restore from Time Machine) for the whole Mac, or from Migration Assistant to recover accounts and data on a freshly installed Mac.
Erasing to sell or give away: System Settings › General › Transfer or Reset › Erase All Content and Settings. The operation deletes the encryption key (instant, permanent erasure), signs out of the Apple Account and removes the Mac from Find My. Do it before handing the Mac over: otherwise the new owner will remain blocked by Activation Lock.
8. DFU restore
When the Mac no longer starts at all, neither on macOS nor in recovery (black screen, boot loop after an interrupted firmware update), there's still DFU mode (Device Firmware Update). You need:
- a second Mac running macOS 14 or later, switched on and connected to the internet;
- a USB-C to USB-C cable that carries both data and power (avoid Thunderbolt 3 cables).
| Operation | Effect |
|---|---|
| Revive | Reinstalls the firmware and recovery; doesn't erase the Mac's contents |
| Restore | Erases the Mac and returns it to factory settings |
Step 1. Plug the cable into the DFU port of the faulty Mac: it varies by model, and the Apple page cited in the sources gives it for each one.
Step 2. On the faulty Mac, use the DFU key combination for the model (detailed on the same page).
Step 3. On the second Mac, a DFU window appears in the Finder (with older versions of macOS, the free Apple Configurator tool does the same thing).
Step 4. Always try Revive first. Only use Restore if reviving fails.
9. Common faults and where to start
| Symptom | First lead |
|---|---|
| Mac slow since an update | Wait for indexing to finish (mds_stores, photoanalysisd), then see Speeding up a slow Mac |
| Noisy fan, hot Mac | Activity Monitor, CPU tab; vents unobstructed |
| Battery draining during sleep | pmset -g assertions and the Energy tab |
| App crashing at launch | Update the app; test in a test account |
| Flashing question mark at start-up | Recovery mode, Disk Utility, reinstall macOS |
| Spontaneous restarts | panic-full reports in Console; disconnect accessories; Apple Diagnostics |
| Device not recognised | Accessory permission in Privacy & Security; another cable or port |
| Black screen, no response | Forced shutdown (hold the button for 10 s), then recovery, then DFU |
10. Maintenance plan
| Frequency | Action | Done? |
|---|---|---|
| Every month | macOS and apps up to date, Mac restarted | ☐ |
| Every month | Time Machine: date of the last backup checked | ☐ |
| Every quarter | Free space above 15% (System Settings › General › Storage) | ☐ |
| Every quarter | Login and background items reviewed | ☐ |
| Every quarter | Battery health (System Settings › Battery) | ☐ |
| Every year | Restore a file from Time Machine to test the backup | ☐ |
| Every year | Apple Diagnostics | ☐ |
| Every year | Vents dusted (desktop Macs, MacBook Pro) | ☐ |
| Before resale | Erase All Content and Settings, Find My turned off | ☐ |