

Before you start
- A dedicated 64-bit machine (its disk will be completely erased)
- A USB stick of at least 2 GB
- A free IP address on your network (see IP address, subnet mask and gateway)
- A screen and a keyboard plugged in for the duration of the installation
In plain words
Installing Proxmox VE is like installing an operating system, except that this one has no desktop: once installed, the machine is tucked away in a corner, with no screen, and everything is controlled from a web browser, on another computer. The installation takes five steps: download the image, copy it to a USB stick, boot the machine from that stick, answer six screens, then log in at the address shown.
This tutorial follows Proxmox VE 9.2 (graphical installer). The screens are redrawn from the official installer, with the same labels you'll see. To understand what a hypervisor is, see virtual machines and hypervisors explained simply; to find out whether Proxmox VE is the right choice, see choosing your hypervisor.

1. Check the hardware
| Item | Minimum (for testing) | Recommended (for real use) |
|---|---|---|
| Processor | 64-bit, with VT-x (Intel) or AMD-V (AMD) | Several cores; VT-d or AMD-Vi if you want passthrough |
| Memory | 1 GB | 2 GB for Proxmox, plus the memory of all your VMs; with ZFS, add about 1 GB per TB of storage |
| System disk | One disk | An SSD; two identical SSDs for a ZFS mirror |
| Network | One network card | A Gigabit card or faster, recognised by Linux (common Intel or Realtek cards: no problem) |
The chosen disk will be completely erased
The installer doesn't share a disk with another system: it erases the whole target disk. Unplug any disks holding data you want to keep, so you can't pick the wrong target.
2. Prepare the addressing plan
Proxmox VE needs a static IP address, chosen before installation. Write these values down; you'll enter them at step 5 of the installer.
| Setting | Example | How to choose it |
|---|---|---|
| Full name (FQDN) | pve1.home.arpa |
A short name followed by a domain. home.arpa is reserved for home networks (RFC 8375); in a business, use your internal domain |
| IP address / prefix | 192.168.1.10/24 |
An address on your network outside the DHCP range of your internet router, to avoid a conflict |
| Gateway | 192.168.1.1 |
The address of your internet router |
| DNS server | 192.168.1.1 |
Your router or your own DNS server |
To read and write a prefix such as /24, see subnet masks and CIDR notation.
Choose the name carefully now
The name and address are easy to enter during installation, but tricky to change later, especially once the machine is in a cluster. Pick a neutral, numbered name (pve1, pve2…) rather than a name tied to the hardware.
3. Download the ISO image and check its checksum
- Open the Proxmox downloads page and download the latest Proxmox VE ISO Installer.
- On the same page, copy the SHA256 checksum shown next to the file.
- Calculate the checksum of the downloaded file and compare: they must be identical. A difference means a damaged or tampered file: download it again.
Linux:
sha256sum proxmox-ve_9.2-1.iso
Windows (PowerShell):
Get-FileHash .\proxmox-ve_9.2-1.iso -Algorithm SHA256
macOS:
shasum -a 256 proxmox-ve_9.2-1.iso
Adapt the file name to the version you downloaded.
4. Create the installation USB stick
The Proxmox ISO image must be copied block by block to the stick: this is called "DD mode" or "raw image". Everything on the stick is erased.
On Windows: Rufus or Etcher
Rufus:
- Plug in the stick and start Rufus.
- Device: your stick. Boot selection: click SELECT and choose the ISO.
- Click START.
- If Rufus offers to download another version of GRUB, answer No.
- When asked about the write mode, choose Write in DD Image mode, then confirm.
balenaEtcher is even simpler: choose the image, choose the stick, Flash. It always writes in raw mode.
No UNetbootin, no ISO mode
Proxmox's documentation explicitly advises against UNetbootin, and Rufus's "ISO Image" mode produces a stick that doesn't boot properly. Use DD mode.
On Linux: dd
First identify the stick's name, by comparing the output of this command before and after plugging it in:
lsblk -d -o NAME,SIZE,MODEL,TRAN
NAME   SIZE MODEL            TRAN
sda    476G Samsung SSD 860  sata
sdb   14.6G Ultra USB 3.0    usb
Here, the stick is sdb (transport usb, 14.6 GB). Write the image:
sudo dd bs=1M conv=fdatasync status=progress if=./proxmox-ve_9.2-1.iso of=/dev/sdb
Check the device name three times
dd writes without asking anything. If you enter /dev/sda instead of /dev/sdb, it's your system disk that gets erased. Give the whole disk (sdb), never a partition (sdb1).
On macOS: hdiutil and dd
hdiutil convert proxmox-ve_9.2-1.iso -format UDRW -o proxmox-ve_9.2-1.dmg
diskutil list
diskutil unmountDisk /dev/diskX
sudo dd if=proxmox-ve_9.2-1.dmg bs=1m of=/dev/rdiskX
Replace diskX with the stick's number found with diskutil list. The rdisk prefix (raw access) makes writing much faster.
5. Configure the BIOS or UEFI
When the machine starts, enter the BIOS (Del, F2, F10 or Esc key depending on the manufacturer) and check:
| Setting | Value | Why |
|---|---|---|
| Processor virtualisation (Intel VT-x, AMD-V or "SVM Mode") | Enabled | Without it, no VM can start |
| VT-d or AMD-Vi (IOMMU) | Enabled if available | Only needed for device passthrough |
| SATA disk mode | AHCI | In "RAID" or "Intel RST" mode, disks may stay invisible to the installer |
| Intel VMD (on some recent PCs) | Disabled | Same reason, for NVMe disks |
| Secure Boot | Enabled or disabled, your choice | Supported since Proxmox VE 8.1 |
| Boot order | The USB stick first, or a one-time boot menu (often F11 or F12) | To boot the installer |
| Restart after a power cut (AC Power Recovery, Restore on AC Power Loss) | Power On | The server restarts by itself after a power cut |
6. Boot from the stick and start the installation
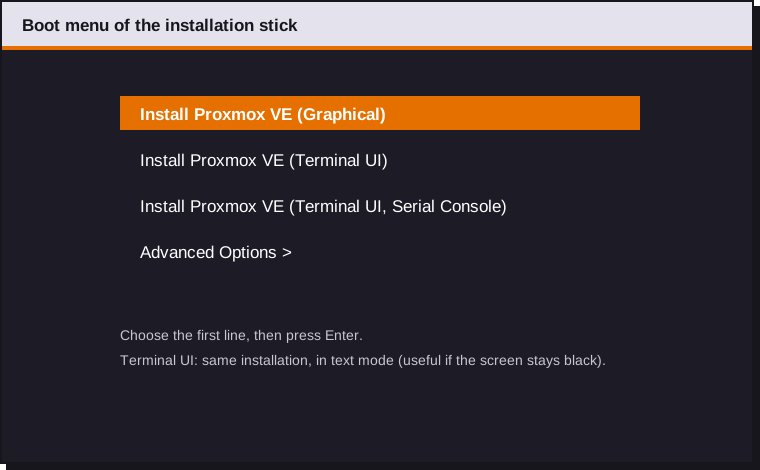
| Menu entry | Use |
|---|---|
| Install Proxmox VE (Graphical) | The normal installation, with the mouse: the one in this tutorial |
| Install Proxmox VE (Terminal UI) | The same screens in text mode, with the keyboard: useful if the graphical display causes problems |
| Install Proxmox VE (Terminal UI, Serial Console) | For servers managed through a serial port |
| Advanced Options | Debug mode, automated installation with an answer file, Rescue Boot, memory test |
Choose Install Proxmox VE (Graphical) and press Enter.
Screen 1: the licence
The installer shows the licence agreement (Proxmox VE is open source software, under the AGPLv3 licence). Click I agree.
Screen 2: the target disk and the file system
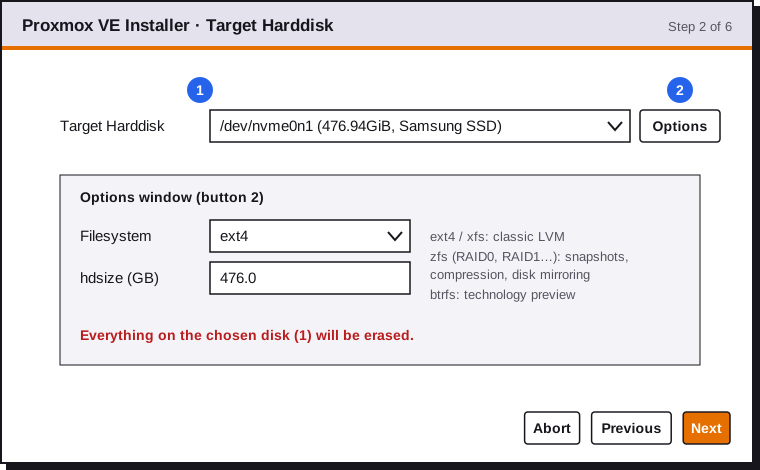
- In Target Harddisk, choose the disk to install Proxmox on. Go by the size and model shown.
- Click Options to choose the file system. If you change nothing, ext4 is used.
| File system | When to choose it | Good to know |
|---|---|---|
| ext4 (default) | A single disk, little memory, first try | Simple and light. The disk is split with LVM: one part for the system, one "LVM-thin" part for the VM disks |
| xfs | Like ext4 | Same LVM layout; no decisive advantage for a first server |
| ZFS (RAID1) | Two identical disks: the recommended choice | Mirror: if one disk dies, the server keeps running. Compression, snapshots, data corruption detection |
| ZFS (RAID0) | A single disk, to benefit from ZFS features | No redundancy; uses more memory than ext4 |
| ZFS (RAID10, RAIDZ-1, -2, -3) | Four or more disks | For larger storage; better kept for data disks than for the system |
| btrfs | Avoid for now | Still a "technology preview" at Proxmox |
Never ZFS on a hardware RAID controller
ZFS must see the disks directly. Behind a hardware RAID card, it can no longer detect or correct errors, and you risk losing data. Switch the card to HBA or IT mode, or choose ext4 on the RAID volume.
The advanced options, in the same window, can stay at their defaults. The most useful ones:
| Option | Role |
|---|---|
hdsize |
Limits the space used on the disk; the rest stays free |
swapsize |
Size of the swap space (ext4 and xfs) |
maxroot, maxvz, minfree |
How space is split between the system, the VMs and the free reserve (ext4 and xfs) |
ashift |
ZFS block size; 12 (4 KiB blocks) suits almost every current disk |
compress |
ZFS compression, enabled by default |
ARC max size |
Maximum memory for the ZFS cache; by default, 10% of the memory, capped at 16 GiB |
Screen 3: country, time zone and keyboard
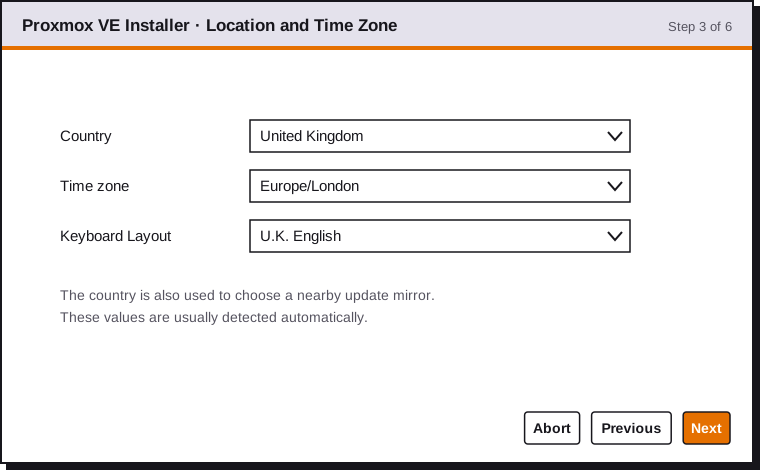
| Field | Example | Note |
|---|---|---|
| Country | United Kingdom | Type the first letters; sets the nearest update server |
| Time zone | Europe/London | Filled in automatically from the country |
| Keyboard Layout | U.K. English | Check it: it also applies to the password you'll type on the next screen |
Screen 4: password and email address
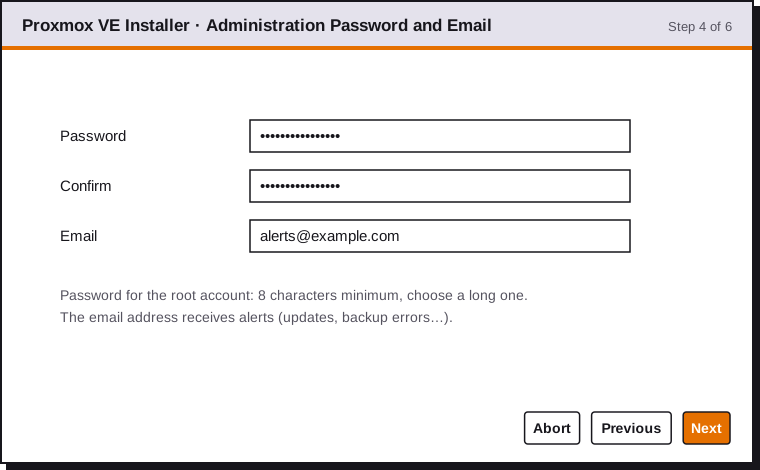
- Password and Confirm: the password of the
rootaccount. It gives full rights over the server and every VM: make it long (at least 16 characters) and keep it in a password manager. - Email: the address that will receive alerts (failed backups, failing disks). A real address is better; it can be changed later.
The keyboard, a classic trap
If the keyboard layout chosen doesn't match your physical keyboard (a U.S. layout on a U.K. keyboard, or QWERTY on an AZERTY or QWERTZ keyboard), the password saved won't be the one you think you typed. If in doubt, avoid characters whose position differs between layouts (symbols such as @, ", #, \, and for AZERTY or QWERTZ the letters a, q, z, w, y, m and the digits), or go back to the previous screen to correct the layout.
Screen 5: network configuration
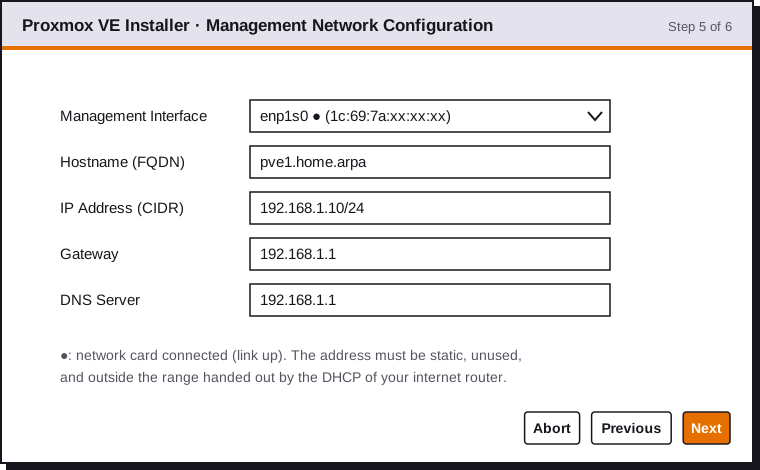
| Field | Example | Note |
|---|---|---|
| Management Interface | enp1s0 |
The network card connected to your network. With several cards, find the one whose cable is plugged in (its state is shown in the list) |
| Hostname (FQDN) | pve1.home.arpa |
A full name, with a dot: a bare name (pve1) is rejected |
| IP Address (CIDR) | 192.168.1.10/24 |
Address and prefix |
| Gateway | 192.168.1.1 |
Your network's gateway |
| DNS Server | 192.168.1.1 |
A reachable DNS server |
The installer suggests the values received by DHCP at startup: replace them with those from your plan. The address will be static, written into the server's configuration, independent of DHCP.
What the installer creates: the vmbr0 bridge
The IP address isn't placed directly on the network card, but on a bridge named vmbr0, connected to that card. This bridge works like a virtual switch: your VMs will plug into it to reach the network, each with its own address.
Screen 6: the summary
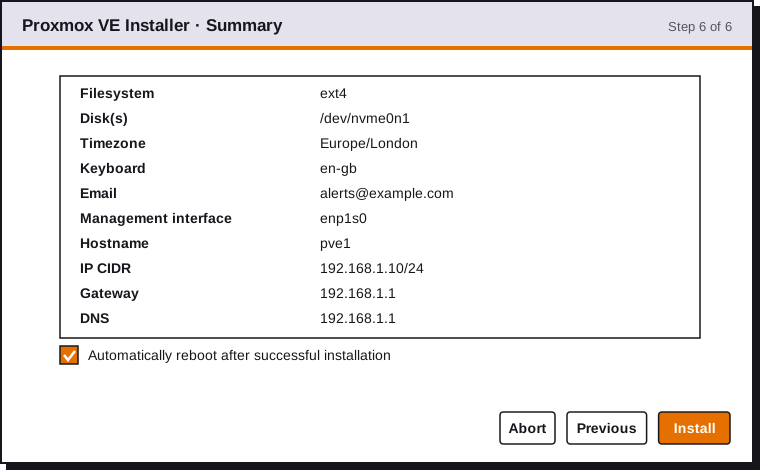
Reread each line, especially the target disk and the IP address. Leave the automatic reboot box ticked, then click Install. Installation takes from a few minutes to about fifteen, depending on the disk.
Remove the USB stick when the machine restarts, otherwise it may start the installer again.
7. First login to the web interface
On restart, the server's screen shows the address to use:
Welcome to the Proxmox Virtual Environment. Please use your web browser to
configure this server - connect to:

  https://192.168.1.10:8006/

pve1 login:
From now on, the server's screen and keyboard are no longer needed. From another computer on the same network:
- Open
https://192.168.1.10:8006(with https and port 8006). - The browser reports an unrecognised certificate: this is normal, Proxmox generates its own certificate during installation. Accept the exception ("Advanced", then "Proceed to the site" or "Accept the risk").
- Log in:
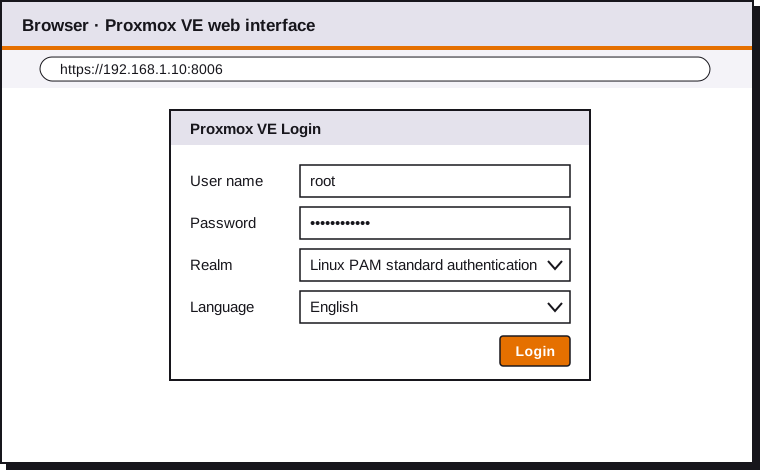
| Field | Value |
|---|---|
| User name | root |
| Password | The password chosen on screen 4 |
| Realm | Linux PAM standard authentication |
| Language | English, or the language of your choice |
A No valid subscription window appears at every login. It only means the server has no paid support subscription: every feature remains available. Click OK.
8. Check the installation
In the web interface, select the server (pve1) in the tree on the left, then Shell: a terminal opens in the browser. Run these three commands.
The installed version:
pveversion
pve-manager/9.2.x/… (running kernel: 7.0.x-x-pve)
The IP address, carried by the vmbr0 bridge:
ip -br a
lo        UNKNOWN   127.0.0.1/8 ::1/128
enp1s0    UP
vmbr0     UP        192.168.1.10/24
The server's full name:
hostname -f
pve1.home.arpa
The exact version numbers depend on when you install. Finally, in Datacenter > Storage, check the two storages created:
| Storage | With ext4 or xfs | With ZFS | Contents |
|---|---|---|---|
local |
Directory /var/lib/vz |
Directory /var/lib/vz |
ISO images, container templates, backups |
| VM disks | local-lvm (LVM-thin) |
local-zfs |
VM and container disks |
9. Troubleshooting
| Symptom | Likely cause | Solution |
|---|---|---|
| Black screen after choosing "Graphical" | Graphics card not handled properly | In the boot menu, select the entry, press e, add nomodeset at the end of the line starting with linux, then Ctrl+X. Or choose Terminal UI |
| The USB stick doesn't appear at boot | Stick written incorrectly, or Secure Boot with old firmware | Recreate the stick in DD mode; check the boot order; try another USB port |
| No disk in Target Harddisk | Controller in RAID or Intel RST mode, or VMD enabled | Set the SATA mode to AHCI, disable VMD in the BIOS |
| Installation fails | Hardware error or failing disk | Detailed logs are on the second console: Ctrl+Alt+F2 |
| No network card offered | Card not recognised (rare, some very recent cards) | Use a USB-Ethernet adapter or an Intel card, then update the system |
| The web interface doesn't respond | Wrong address, http instead of https, missing port, computer on another network |
Check the address shown on the server's screen; test ping 192.168.1.10; on the server, systemctl status pveproxy |
| Password rejected | Keyboard layout different from the physical keyboard during installation | Try typing the password as if on the layout chosen during installation; otherwise, boot into rescue mode and set it again with passwd |
10. What next?
The server works, but a few settings are needed before installing VMs: choose the update repository (the "enterprise" repository, enabled by default, requires a subscription; the "no-subscription" repository is free), update the system, create a named administrator account instead of working as root, enable the firewall and schedule backups. These settings are detailed in the settings after installing Proxmox VE. For command-line access from your computer, see also securing SSH.
Key points
- Prepare before installing: a full name (
pve1.home.arpa), a static IP outside the DHCP range, the gateway and the DNS. - Write the USB stick in DD mode (Rufus, Etcher,
dd), never with UNetbootin. - In the BIOS: VT-x / AMD-V enabled, disks in AHCI.
- ext4 for a single disk, ZFS RAID1 for two identical disks; never ZFS on hardware RAID.
- Check the keyboard layout before typing the root password.
- Everything is then managed from
https://IP:8006, userroot, realm Linux PAM.